Catching the Drift – Snow Fence Basics Explained
There’s no two ways about it. Winter is coming and we can’t stop it. That’s why it will pay to do some work now so you’re not snowed in later.
For people who live in rural areas in the frigid north, a snow fence can do wonders to keep the drive to your house or barn clear. Now is the time to act on it.
Thanks to the 40-year career of Wyoming’s Dr. Ronald Tabler, the “Blizzard Wizard,” we now can install snow fences and wind breaks that work. Dr. Tabler and others have measured snow, wind, humidity, and a host of other factors to be able to predict how—and how well—snow fencing works.
What kind of snow fence do I want?
Temporary snow fences usually come in two flavors, wooden slat or polyethylene. Functionally, both are around 50 percent porosity, meaning they let half the wind and snow pass through, and half is retained and slowed.
Polyethylene fence materials can be more porous or less porous, depending on your needs. They are often colored orange for visibility, but yellow, gray, green, and black are sometimes available, too. A chief benefit is they don’t weigh as much as wooden fences, and often take up much less space for storage, but they are not durable.
Bright orange has a safety advantage for snowmobilers, similar to a hunter’s blaze orange for visibility.
Wood snow fences are made from slats held in place by stout woven wire along the top and bottom. They are most often painted in an attractive brick red color. Although heavier to lug, unroll, and reclaim in the spring, they can last for years. Plan on significant space for storing waist-high rolls, however.
What about posts?
You were thinking the fence was the most important part, weren’t you? Without sturdy posts you might as well unroll the fence material and leave it on the ground.
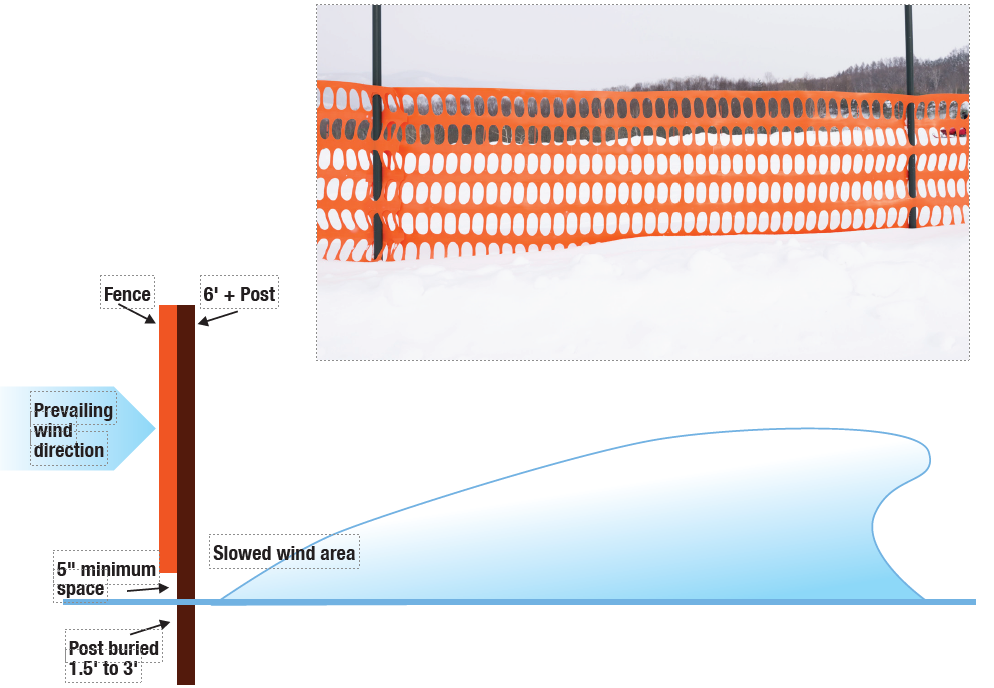
The most common post is T-shaped in cross section. Be sure to pound it deep enough—at least one-third should be below ground—with the flat side facing the prevailing wind. You then affix your fencing material to the flat side so the wind blows it against the post instead of away. Use plastic cable ties, wire, or wire clips.

How high a snow fence will I need?
This is where wind speed, snow loads, fence porosity, and area to be protected come into play.
Here’s a handy formula:
H = [Qt/(3+4P+44P2-60P3)]0.455
• Qt = snow transport (t/m)
• P = porosity (decimal)
Right, we didn’t get that either. And to a certain extent, you will be buying snow fencing from a manufacturer that creates fencing in only a few different heights. Typically, snow fence comes in four-foot (48-inch) height.
How far away from my road should it be?
Dr. Tabler and others have performed extensive research and have developed intricate formulas to help answer that question. Since a snow fence is erected to create a drift where you want it (and thereby leaving almost no snow where you don’t), we can use the fence height as a guide: The most snow will be trapped anywhere from 10 to 20 times away from the fence’s height.
Thus, if you have purchased a six-foot high snow fence, it should be placed 210 feet from the road. Said another way, that will be the downwind location with the least accumulated, drifting snow.
The consensus is that your snow fence distance from the road (where the least amount of snow will be deposited) should be around 35 times its height for heavy snow and wind conditions.
The purpose of a snow fence is to actually create a drift.
Common snow fence errors
When your snow fence works as planned, it is a thing of beauty—driveways or buildings protected by a correctly-installed snow fence have little-to-no snow removal needed. But do it wrong, and you’ll pay the price. Do your homework to avoid the following errors.
Installing too close to the area you hope to protect. This creates a drift right where you didn’t want it.
Installing too far away is like having no snow fence at all. Having gaps in the snow fence merely creates “pockets” of snow but allows much more to blow through.
Not enough coverage is what you get when you try to be economical with Mother Nature—she will create even larger drifts where the wind curls around the ends. Figure on a full 30 percent greater length than you need.
Wrong location from the wind. Sometimes the usual prevailing wind can change by many degrees on the compass, but usually it is just because the installers guessed wrong or lost their bearings.
Fence post depth is important, and about 1/3 of your post should be buried to give maximum support against wind loads. In areas where rock, not soil, is the rule, highway crews use deadman anchors—large blocks of cement weighing several hundred pounds—to hold them in place.
A common problem is waiting too late to install your snow fence. This is not a job to be done in harsh winter winds, or after the ground has frozen.
An additional tip: One crucial tip is to raise your snow fence five to six inches off the ground. This actually improves the snow fence’s performance by about 30 percent.
You can plant, too
In addition to installing snow fencing, there are other options to consider, either permanent or temporary.
On highways with a history of blowing and drifting snow, the Minnesota Department of Transportation annually purchases standing corn rows.
Other states participate in this, too, and the landowner can still harvest that corn in the spring (if deer haven’t consumed it, that is).
More permanent is a living snow fence. Properly designed and placed, living barriers of trees, shrubs and bushes can slow and trap snow before it drifts into roadways or farmsteads.
Living wind breaks made from an organized planting of trees, bushes, shrubs, and grasses not only provide valuable habitat for animals, but prevent drifting snow.
A common approach where trees aren’t desired is to plant a twin shrub row. Contact your state extension service for the best planting options in your area.
Thanks to US Netting, Inc. of Erie, Penn. for tips and assistance with illustrations.


